How to Choose Your First FPV Radio Without Buying Twice
A practical buying guide that helps new pilots choose a radio based on protocol support, ergonomics, and future upgrade path.
How to Choose Your First FPV Radio Without Buying Twice
Best FPV Radio for Beginners: Top Controllers & Setup Guide
Ready to take flight in the exhilarating world of FPV drones, but feeling overwhelmed by the gear? Choosing your first FPV radio transmitter is one of the most critical decisions you'll make, as it's your direct link to your drone and the key to mastering flight. Don't worry, you've landed in the right place! This guide is your flight school for selecting, setting up, and getting comfortable with the best FPV radios for beginners, ensuring a smooth takeoff into your FPV journey.
At fpvlovers.com.tr, we believe that a strong foundation makes for a confident pilot. Your FPV radio isn't just a gadget; it's your command center, your training partner, and your gateway to incredible aerial experiences. We'll cut through the jargon, highlight the essential features, and recommend the best budget-friendly options that will serve you well from your first simulator session to your first real-world flight.
Why Your FPV Radio is Your Most Important Investment
Many beginners focus on the drone itself, but experienced pilots will tell you that a reliable, feature-rich radio is paramount. It's the one piece of equipment that truly transcends individual drone builds and upgrades.
More Than Just a Controller: The Brains of Your Operation
Think of your FPV radio as the brain and nervous system connecting you to your drone. It translates your every stick movement and switch flick into commands that your drone understands. A good radio provides precise control, minimal latency, and a robust connection, all of which are crucial for fluid, confident flying. Without a solid radio, even the most advanced drone is just a paperweight. It’s your primary interface, and its quality directly impacts your learning curve and enjoyment.
Longevity: A Radio That Grows With You
Unlike drones, which can be crashed, upgraded, or replaced frequently, a quality FPV radio is a long-term investment. A well-chosen radio will likely outlast several drones, camera systems, and even FPV goggles. It's a piece of gear that you won't need to upgrade as you progress from tiny whoops to cinematic rigs or freestyle quads. This makes spending a bit more on a good radio upfront a very smart financial decision in the long run.
The Foundation for Simulator Practice
Before you even think about flying a real drone, you'll spend countless hours on an FPV simulator. Your radio is the only way to effectively practice in these virtual environments. A comfortable, responsive radio with good gimbals (the sticks you control) will make your simulator experience much more realistic and effective, building muscle memory and improving your skills without the risk or cost of real crashes. This is where your journey truly begins.
Essential Features for a Beginner FPV Radio
Navigating the world of FPV radio features can be daunting. Let's break down what truly matters for a beginner.
Form Factor: Gimbal Type & Ergonomics (Game Controller vs. Tray)
FPV radios come in various shapes and sizes, primarily categorized into "game controller" style and "tray" style.
- Game Controller Style (Gamepad): These radios, like the Radiomaster Zorro or Jumper T-Lite, are compact and held like a video game controller. They're great for portability and pilots who prefer thumb-controlled sticks.
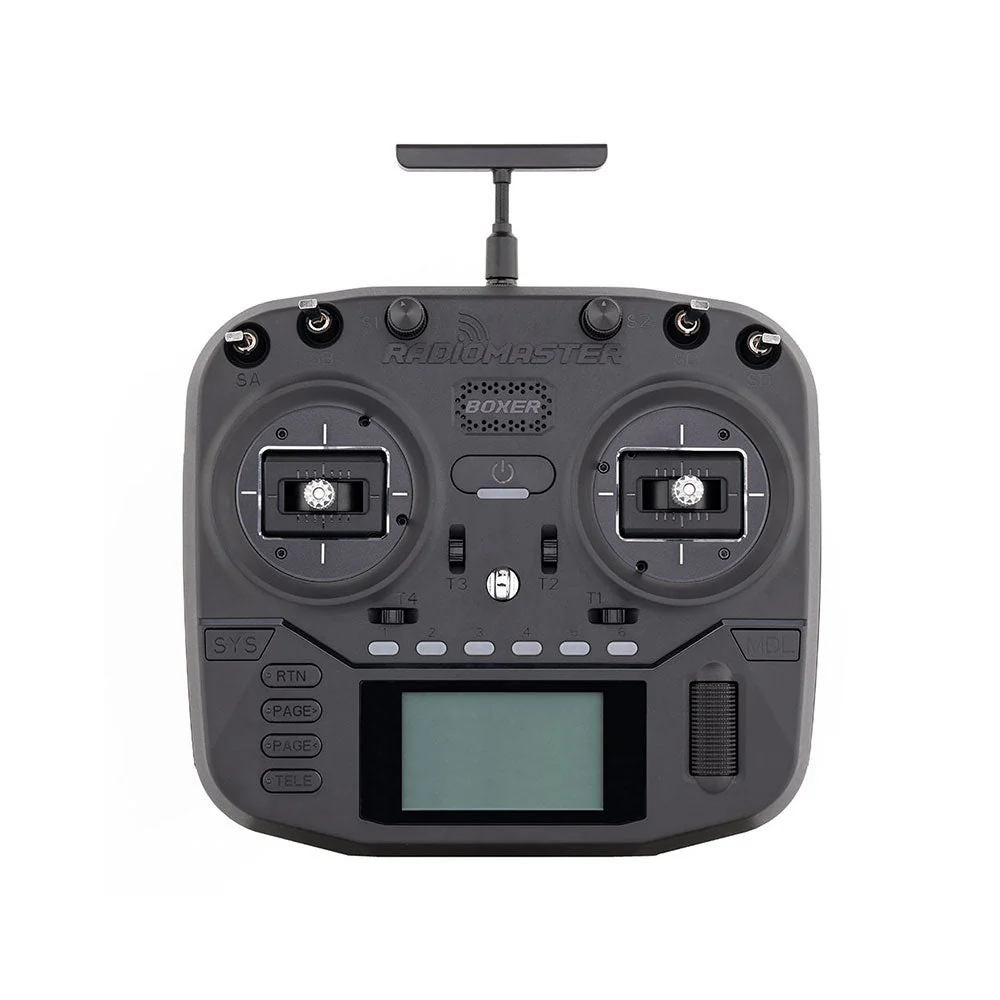
- Tray Style (Traditional): Radios like the Radiomaster Boxer or TX16S are larger and often rest on a neck strap or tray, allowing pilots to "pinch" the sticks between their thumb and forefinger for finer control.
For beginners, ergonomics are key. Choose a radio that feels comfortable in your hands. You'll be holding it for hours, especially during simulator practice.
Gimbal Type: This is crucial.
- Hall Sensor Gimbals: These use magnetic fields instead of physical contact, meaning no wear and tear, leading to much greater precision and longevity. They are a must-have.
- Potentiometer Gimbals: Cheaper, but prone to wear and "drift" over time. Avoid these if possible for your main radio.
Pilot Tip: Visit a local hobby shop or FPV meet-up if you can, and try holding different radios. What feels good in someone else's hand might not feel good in yours.
Radio Protocols: Why ELRS Dominates for Beginners
The radio protocol is the language your radio uses to communicate with your drone. For beginners, and frankly, for most FPV pilots today, ExpressLRS (ELRS) is the undisputed champion.
- ELRS (ExpressLRS): An open-source, high-performance radio link system that offers incredible range, extremely low latency, and robust signal penetration. It's affordable, widely supported, and constantly evolving. Most modern beginner-friendly radios come with an internal ELRS module, meaning you don't need to buy an extra external module.
- Why ELRS is Best for Beginners:
- Cost-Effective: ELRS receivers are tiny and inexpensive.
- Performance: Excellent range and low latency mean a more responsive and reliable connection, reducing frustration.
- Simplicity: Binding is often a simple "bind phrase" rather than complex button sequences.
- Future-Proof: It's the standard for new FPV builds.
While other protocols like FrSky D8/D16, Crossfire, or Tracer exist, ELRS offers the best balance of performance, affordability, and ease of use for new pilots. Ensure your chosen radio has an internal ELRS module or a JR bay for an external one.
Open-Source Firmware: EdgeTX and Freedom to Customize
Your radio's firmware is its operating system. For FPV, EdgeTX (and its predecessor, OpenTX) are the industry standards.
- EdgeTX: A powerful, open-source firmware that allows for extensive customization, telemetry, scripting, and much more. It's incredibly flexible and supported by a massive community.
- Benefits for Beginners:
- Learning Curve: While initially complex, the sheer volume of tutorials and community support makes learning EdgeTX manageable.
- Flexibility: You can configure any switch, button, or stick to perform specific functions, allowing your radio to adapt to your evolving needs.
- Future-Proofing: As you advance, EdgeTX will continue to offer the features you need.
Avoid radios with proprietary, closed-source firmware, as they often lack features, customization, and community support.
Battery Life and Charging Convenience
You don't want your radio dying mid-flight or during a crucial simulator session.
- Look for radios that use standard, easily replaceable batteries like 18650 cells (often two of them) or have a built-in rechargeable battery.
- USB-C charging is a huge convenience, allowing you to charge your radio with the same cable as many other devices, even from a power bank. Some radios also support balance charging via a dedicated port.
Getting Started: Initial Radio Setup & Simulator Integration
Once you have your radio, the real fun (and learning) begins!
First Power-Up: Basic Settings & Calibration
When you first power on your EdgeTX radio, you'll be prompted to perform initial setup steps:
- Calibrate Gimbals: Follow the on-screen instructions to move your sticks through their full range of motion. This ensures your radio accurately reads your inputs.
- Calibrate Switches: Flip all your switches up and down to calibrate them.
- Set Date/Time: Standard stuff.
- Check Stick Mode: Most FPV pilots use Mode 2, where the left stick controls throttle and yaw, and the right stick controls pitch and roll. Confirm this is set correctly.
Pilot Tip: Spend time exploring the menus. Don't be afraid to click around (you won't break anything!). Familiarity with the menu structure will save you headaches later.
Connecting to Your FPV Simulator: A Must-Do Step
This is your flight school's primary classroom.
- Connect via USB: With your radio powered off, plug it into your computer using a USB-C cable.
- Select USB Mode: Your radio will likely prompt you to choose a USB mode. Select "USB HID" or "Joystick" mode.
- Open Simulator: Launch your preferred FPV simulator (e.g., Velocidrone, Liftoff, DRL Simulator, Uncrashed).
- Calibrate in Simulator: Go to the controller settings within the simulator. It should detect your radio as a joystick. Follow the simulator's calibration steps to assign axes (throttle, yaw, pitch, roll) and switches (for arming, modes).
Pilot Tip: Start with a simple, stable drone in the simulator and practice hovering and basic turns before attempting advanced maneuvers. Consistency is key!
Understanding Channels and Modes (Mode 2 Explained)
Your radio transmits signals on various "channels" (usually 4-8 for basic FPV flight). Each channel corresponds to a specific control input:
- Channel 1 (Aileron/Roll): Right stick left/right.
- Channel 2 (Elevator/Pitch): Right stick up/down.
- Channel 3 (Throttle): Left stick up/down.
- Channel 4 (Rudder/Yaw): Left stick left/right.
As mentioned, Mode 2 is the global standard for FPV. While other modes exist, learning on Mode 2 will make it easier to follow tutorials and get help from the community.
Updating Firmware: Keeping Your Radio Current
Regularly updating your radio's firmware (EdgeTX) is crucial for bug fixes, new features, and compatibility.
- Download EdgeTX Companion: This desktop application makes the update process easy.
- Backup Your Settings: Always back up your models and radio settings before an update.
- Follow Instructions: EdgeTX has excellent documentation. Typically, you'll connect your radio in "Bootloader" mode (often by holding specific buttons while powering on), then use EdgeTX Companion to flash the new firmware and update the SD card contents.
Pilot Tip: Don't update right before a flying session. Do it when you have time to troubleshoot if anything goes wrong.
Buyer's Guide: Top FPV Radios for Beginners in 2024
Here are our top recommendations for beginner-friendly FPV radios, striking a balance between features, performance, and price. All these options come with internal ELRS modules.
Radiomaster Zorro: The Compact Powerhouse
The Radiomaster Zorro has become an incredibly popular choice for its unique gamepad-style form factor and powerful features.
- Form Factor: Gamepad style, very ergonomic and comfortable for thumb-stick flying.
- Gimbals: High-quality Hall Sensor Gimbals.
- Protocol: Available with internal ELRS (ExpressLRS).
- Firmware: EdgeTX.
- Battery: Uses 2x 18350 batteries (internal) or can be powered by an external 18650 battery pack (sold separately) via a special module. USB-C charging.
- Pros:
- Excellent portability due to its compact size.
- Comfortable, familiar gamepad feel.
- Crisp monochrome LCD screen.
- Solid build quality for its price point.
- Module bay for external modules if needed (e.g., Crossfire).
- Cons:
- Smaller screen can be harder to read for some.
- 18350 batteries offer less flight time than 18650s, so consider the external battery pack.
- Best For: Pilots who prefer a compact, console-style controller for portability and comfortable thumb-stick flying.
Radiomaster Boxer: Full-Size Performance, Beginner-Friendly
The Radiomaster Boxer bridges the gap between compact radios and large, traditional tray-style transmitters, offering a fantastic balance of features and ergonomics.
- Form Factor: Compact tray style, but still very comfortable to hold.
- Gimbals: High-quality Hall Sensor Gimbals.
- Protocol: Available with internal ELRS (ExpressLRS).
- Firmware: EdgeTX.
- Battery: Uses 2x 18650 batteries (internal). USB-C charging.
- Pros:
- Excellent ergonomics for both thumbing and pinching.
- Larger, clear monochrome LCD screen.
- Fantastic battery life with 18650 cells.
- Full-size JR module bay for maximum expandability.
- Premium feel and robust build quality.
- Cons:
- Less portable than the Zorro due to its larger size.
- Best For: Beginners who want a full-sized radio experience without the bulk of a TX16S, offering superb ergonomics, battery life, and expandability. It's a true "buy once, cry once" option.
Jumper T-Lite V2: The Budget-Friendly Micro Marvel
For those on a very strict budget or prioritizing ultimate portability, the Jumper T-Lite V2 is a compelling option.
- Form Factor: Ultra-compact gamepad style.
- Gimbals: Potentiometer gimbals (some versions might have hall, but generally expect pots). This is a key differentiator.
- Protocol: Available with internal ELRS (ExpressLRS) or 4-in-1 multi-protocol.
- Firmware: EdgeTX.
- Battery: Uses 1x 18650 battery. USB-C charging.
- Pros:
- Extremely portable and lightweight.
- Very attractive price point.
- Good for small hands.
- Cons:
- Smaller gimbals may feel less precise for some.
- Potentiometer gimbals are less durable and precise than hall sensors.
- Smaller screen.
- Single 18650 means shorter battery life than the Boxer.
- Best For: Absolute beginners on a tight budget, or those primarily flying tiny whoops and needing maximum portability. Understand the compromise on gimbal quality.
FrSky LiteRadio 3: Simplicity for the Absolute Beginner
The FrSky LiteRadio 3 is designed for extreme simplicity and affordability, often bundled with beginner-friendly RTF (Ready-To-Fly) kits.
- Form Factor: Gamepad style, very basic design.
- Gimbals: Potentiometer gimbals.
- Protocol: Available in ELRS, FrSky D8/D16, or CC2500 versions. Ensure you get the ELRS version!
- Firmware: Custom FrSky firmware (not EdgeTX).
- Battery: Internal rechargeable battery. USB-C charging.
- Pros:
- Extremely easy to use, almost plug-and-play.
- Very low price point.
- Great for simulator practice and tiny whoops.
- Cons:
- Limited features and customization due to proprietary firmware.
- Potentiometer gimbals.
- Not future-proof; you'll likely outgrow it quickly.
- No external module bay.
- Best For: Absolute beginners who want the simplest, cheapest entry point, especially if buying an RTF kit that includes it. It's a good "test the waters" radio but expect to upgrade eventually.
Beyond the Basics: Your First Steps Towards Flying
With your radio chosen and set up for the simulator, you're ready to think about your first drone.
Binding Your Radio to a Drone (ELRS Simplified)
Once you have an ELRS-equipped drone, binding is remarkably straightforward:
- Flash ELRS Firmware: Ensure both your radio's internal ELRS module and your drone's ELRS receiver are running compatible ELRS firmware versions.
- Set Bind Phrase: In your radio's ELRS LUA script (accessed via the radio's menu), set a unique "Bind Phrase."
- Power Cycle Drone: Power your drone on and off three times rapidly. The ELRS receiver LED will start a rapid double flash.
- Bind: Select "Bind" in the ELRS LUA script on your radio. The receiver LED should go solid, indicating a successful bind.
Pilot Tip: Keep your bind phrase simple and memorable. Write it down!
Basic Configuration in Betaflight/ArduPilot
After binding, you'll connect your drone to your computer via USB and open the Betaflight Configurator (or ArduPilot Mission Planner for larger drones).
- Check Receiver Tab: Verify that your stick inputs (throttle, yaw, pitch, roll) move correctly on the screen when you move your radio sticks.
- Setup Modes Tab: Assign an arming switch (crucial safety feature!) and potentially flight mode switches (e.g., Angle, Acro).
- Failsafe: Configure failsafe to ensure your drone lands safely if it loses signal.
Pilot Tip: Don't rush this step. Correct configuration here prevents crashes later. Watch YouTube tutorials specific to Betaflight setup.
Practicing on a Simulator: Your Best Friend
We cannot stress this enough: practice, practice, practice on the simulator! Before attempting your first real flight, aim for at least 10-20 hours of simulator time. Focus on:
- Hovering and controlled landings.
- Figure 8s and smooth turns.
- Gate practice (if your simulator has them).
- Recovery from inverted flight (eventually).
Simulators like Velocidrone and Liftoff are highly realistic and offer excellent training environments.
Joining the FPV Community for Support
The FPV community is one of the most welcoming and helpful out there.
- Online Forums & Groups: Websites like RotorRiot, FPV-Know-It-All, and various Facebook groups are invaluable resources.
- Discord Servers: Many FPV content creators and brands host active Discord servers where you can ask questions and get real-time help.
- Local FPV Clubs: If you're lucky enough to have a local club, join them! Flying with experienced pilots is the fastest way to learn and get hands-on advice.
Frequently Asked Questions About Beginner FPV Radios
What FPV radio should a beginner buy?
For most beginners, the Radiomaster Boxer (ELRS version) offers the best long-term value, excellent ergonomics, and features. If you prefer a compact, gamepad style, the Radiomaster Zorro (ELRS version) is an outstanding choice. For ultra-budget or extreme portability, consider the Jumper T-Lite V2 ELRS, but be aware of the gimbal compromise.
How much should I spend on my first FPV radio?
Expect to spend between $100 - $180 USD for a quality beginner radio with internal ELRS and Hall Sensor Gimbals (like the Zorro or Boxer). While cheaper options exist, investing in a good radio upfront saves money and frustration in the long run.
Can I use a beginner FPV radio with a simulator?
Absolutely! Using a simulator is the most important step for any FPV beginner. All the recommended radios (Radiomaster Zorro, Boxer, Jumper T-Lite V2, FrSky LiteRadio 3) can connect to your computer via USB and function as a joystick for FPV simulators.
What features are essential for a beginner FPV transmitter?
- Internal ExpressLRS (ELRS) module: For superior range, low latency, and affordability.
- Hall Sensor Gimbals: For precision, durability, and a smooth feel.
- EdgeTX firmware: For customization, community support, and future-proofing.
- USB-C charging and decent battery life: For convenience and uninterrupted practice.
- Comfortable ergonomics: Choose a form factor (gamepad or tray) that feels good in your hands.
What's the easiest FPV radio to learn on?
While the FrSky LiteRadio 3 is simpler due to its limited features, radios running EdgeTX (like the Radiomaster Zorro or Boxer) are ultimately easier to learn on in the long run because of the vast amount of community support, tutorials, and their ability to grow with your skills. The initial setup might seem a bit more involved, but the benefits far outweigh this.
Ready for Takeoff: Your FPV Journey Starts Here
With the right FPV radio in hand and a solid understanding of its setup, you're now perfectly positioned to embark on your FPV adventure. Remember, practice makes perfect, especially on the simulator. Choose the radio that feels right for you from our recommendations, get it set up, and start logging those flight hours. The sky awaits!
Which radio will you choose to kickstart your FPV journey? Share your thoughts in the comments below!
RELATED GUIDES
Source: rotorriot.com
rotorriot.com